Inspecting elements of an app using Appium Inspector and BrowserStack!

Appium is not a new name in the automation world and every automation engineer knows it well as it is widely used for automating android and iOS apps.
Before I begin writing about inspecting the elements of the app, let me first introduce you to appium.
What is Appium?
Appium is an open source test automation framework for use with native, hybrid and mobile web apps.
It drives iOS, Android, and Windows apps using the WebDriver protocol.
Getting Started
Appium supports iOS as well as Android apps. To install appium and get started with using it there are some steps which you need to follow to set it up on different OS versions like Windows and macOS.
Checkout this blog to learn how to setup appium on macOS
Checkout this blog to learn how to setup appium on Windows
What is Appium Inspector?
Appium Inspector is basically just an Appium client (like WebdriverIO, Appium’s Java client, Appium’s Python client, etc…) with a user interface. There’s an interface for specifying which Appium server to use, which capabilities to set, and then interacting with elements and other Appium commands once you’ve started a session.
Download and Installation
You can download appium inspector from this link and as per the OS you have you can go ahead and install it.
Download Appium-Inspector-windows-2022.2.1.exe for windows and install it. > Download Appium-Inspector-mac-2022.2.1.dmg for macOS and install it.
What is BrowserStack?
BrowserStack is a cloud Service Platform provides instant access to 3,000+ real mobile devices and browsers on a highly reliable cloud infrastructure that effortlessly scales as testing needs grow. With BrowserStack, Dev and QA teams can move fast while delivering an amazing experience for every customer.
What do we need to do to inspect element of an app using BrowserStack?
Problem Statement
Consider a scenario where you need to inspect elements of the app for automating it and you don’t have the device physically available with you! Unless you have the locators of the app available you cannot proceed with automation stuff.
This has happened with me a lot like I own an android device and its pretty easy for me to connect using that device and find out the locators and write the automation tests. But in case if I want to write the automation tests for an iOS app then I am not in a good position to start with as I don’t own an iphone device and very much I am blocked to start with testing and writing the automation tests for it.
So what do we do?
In such a situation, the cloud services like BrowserStack comes to the rescue where we can take leverage of the physical devices on BrowserStack to actually inspect the locators.
Uploading the app on BrowserStack
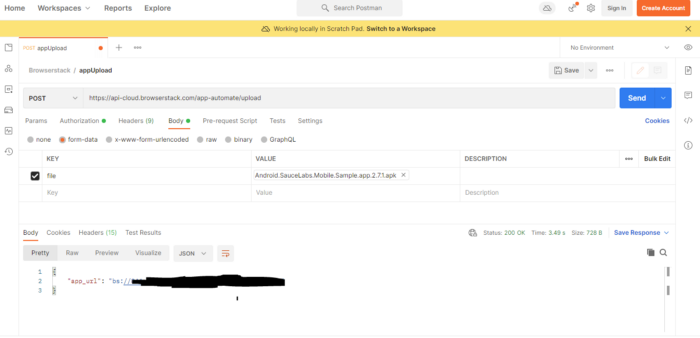
The first step is to upload the app to BrowserStack so we could use it for testing. For uploading the app, we need to hit an API which is provided by BrowserStack. Once you hit the API, you should get an app_url in response which can be updated in the app path in appium desired capabilities and used further to start the Appium session on BrowserStack.
To upload the app you must be an authorized user and have an active account on BrowserStack,
as username and accesskey are required to upload the app.
I am using Postman to upload the app in this example.
Appium Inspector
Start the Appium Inspector and Select Cloud Provider >> BrowserStack
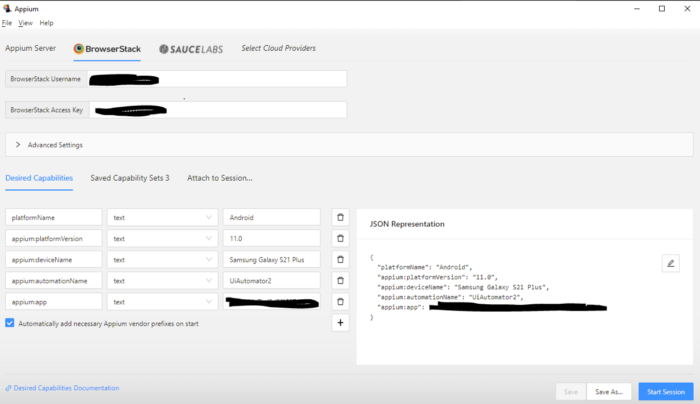
We need to provide the appium desired capabilities for starting the respective device with the app as per the requirement. In this example, I am running the app on Samsung Galaxy S21 Plus on Android Version 11.0. Since I have already uploaded the app to BrowserStack, I would be using the same app_url in the app path in appium desired capabilities. Since, this is a demo, I am using android phone, you can use any other device like iphone or any other Samsung device, on BrowserStack as per your need.
App Details: I am using android version of Saucelabs demo app
Here are the appium desired capabilities I have used:
{
  "platformName": "Android",
  "appium:platformVersion": "11.0",
  "appium:deviceName": "Samsung Galaxy S21 Plus",
  "appium:automationName": "UiAutomator2",
  "appium:app": <app_url recieved in response on uploading the app>
}
You are all set now to Start the Session and inspect the element! Click on Start Session button to start the session and inspect the elements.
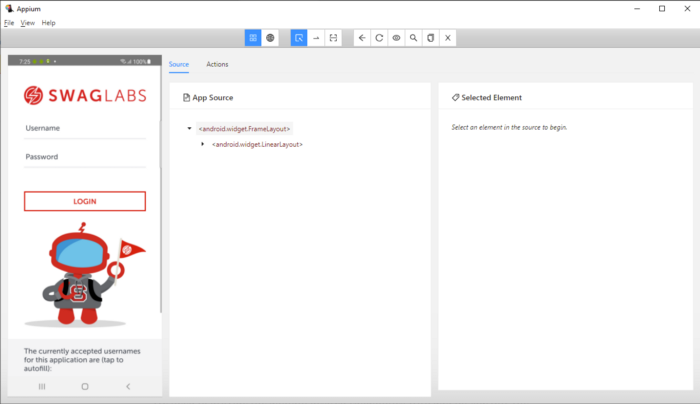
Lets inspect the username field and see what all locators we get
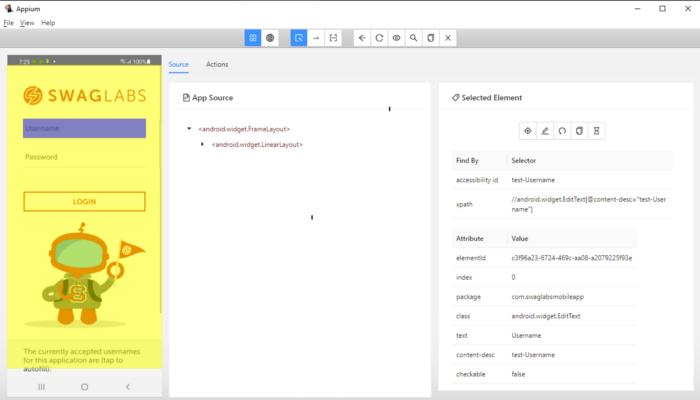
We see the accessibility id as test-username which can be used in the test for locating username field.
Now, lets inspect the password field and login button to check for their respective locators.
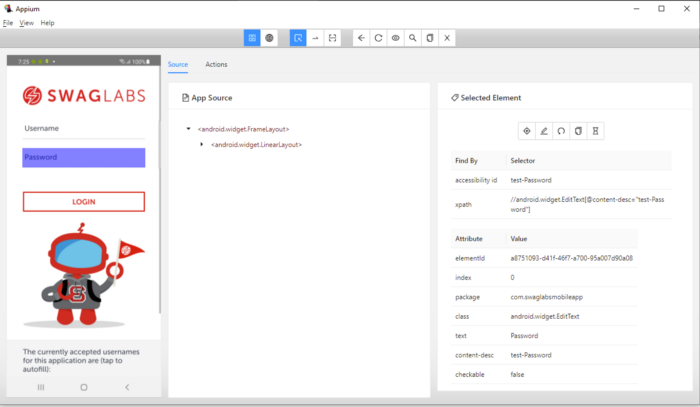
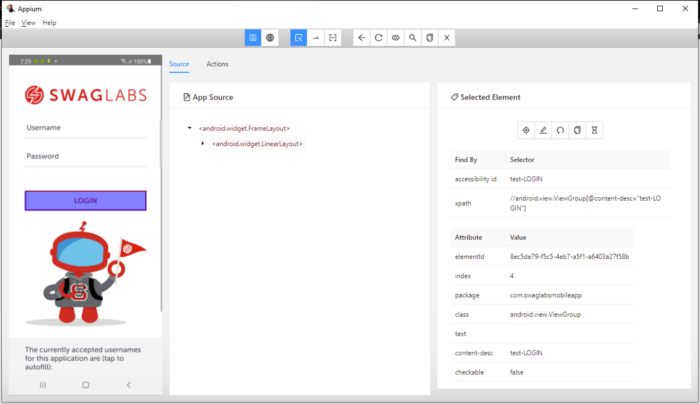
We see the accessibility id as test-Password for Password field and test-LOGIN as accessibility id for Login button.
Though we also see xpath as a locator, however, its not recommended to use xpath locator and always ask the developers to add a specific test-id or accessibility id for locating elements, incase if there are none.
Now, using these locators we are now all set to write the automation test script for login scenario. Similarly, we can use this session for fetching locators for another fields within the app.
Hope, you got to know how to inspect the elements by running the app on BrowserStack.
Please comment below in case if you need any help or clarification, I would be happy to help!
Happy Testing!