End to End Testing using SuperTest

I have been a huge fan of rest-assured framework in java and have been using it quite largely for testing in my previous project. Since I have been Working on java for a couple of years, I thought of exploring some other programming languages as well and decided to get my hands dirty on javascript as it is light weight, having object oriented support and mostly similar to java, hence it was fun and easy to learn it in quick time.
To begin with API Testing, I was exploring and trying to find out some library/package on npm which I could use for testing the APIs. While exploring I came to across supertest. Initially, I had to google a lot about it as I couldn’t find an easy to understand documentation about it, however, I went further understanding how to install and use it. It was fun using this library and automating the tests. I enjoyed writing tests far better using this library than I had been doing using rest-assured. Let me take you to a tour of supertest describing what it is and How to use it!
What is SuperTest?
SuperTest is a Node.js library that helps in testing APIs. It extends another library called superagent, a JavaScript HTTP client for Node.js and the browser. You can use SuperTest as a standalone library or with JavaScript testing frameworks like Mocha.
Testing APIs
What is API Testing?
I have created this repository on github which has sample test cases explaining how to test API, checkout the file named “TestCases_for_ApiTesting.xlsx” from the repository.
Getting Started
To begin with, you need to have Node.js installed on your machine. Download Node.js from here and install it on your machine, if you don’t have it.
I have used Mocha framework for writing the tests and Chai for assertions. Using the command given below you can install supertest, mocha and chai in one go:
npm i -D supertest mocha chai
Once the installation of the required library is complete you are all set to start using the library and write the API tests and perform the assertions.
Following are the list of APIs on the restful-booker website which I have used to write end to end tests.
For sending the Update, Partial Update and Delete Booking requests it requires an AUTH token which is generated using the CreateToken API.
Since its testing end to end scenarios, hence, I chalked out the following test automation strategy to test the APIs so it could be tested in an efficient way:
- Create a Booking, all test data required to be sent in the body of the request will be picked from a separate json file.
- Assert the response of Create Booking request with the json test data file.
- Save the Booking Id from create booking response in a variable so it could be used in further tests.
- Get Booking details using the booking id in step 2 and compare with the create booking response ideally from the json file which holds the test data.
- Create Auth token function so it could be reused in Put, Patch and Delete requests.
- Update the booking dates and total price using the booking id in step 2 and AUTH token in step 4. Use separate test data json file for Put request which holds updated booking data.
- Assert the response of update booking.
- Update the
firstnameandlastnameusing the Patch request. - Assert the response returned from Patch request using the updated data that was supplied.
- Delete the booking and assert the status code.
- Get the Booking Id which is deleted(booking Id from Step 2), here it is expected to send status code 404 since the booking is deleted.
This step confirms that booking got successfully from the system.
Lets get into the code now and see how the implementation of the above steps can be done!!
Setup
First of all, we need to import the supertest library and expect library from chai to setup and start its respective functions in our tests.
It can be done by writing the following statements on the top of your tests.
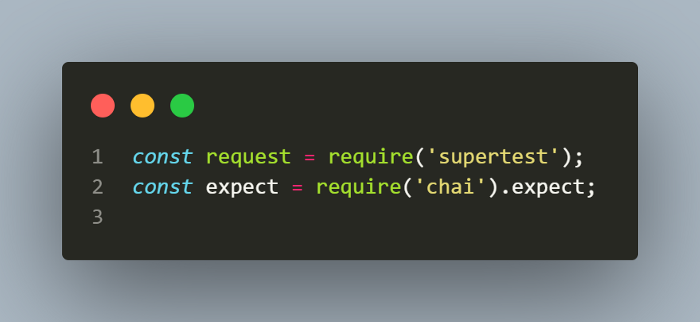
Now, you are all set to write the tests. We will start by implementing the strategy I discussed above.
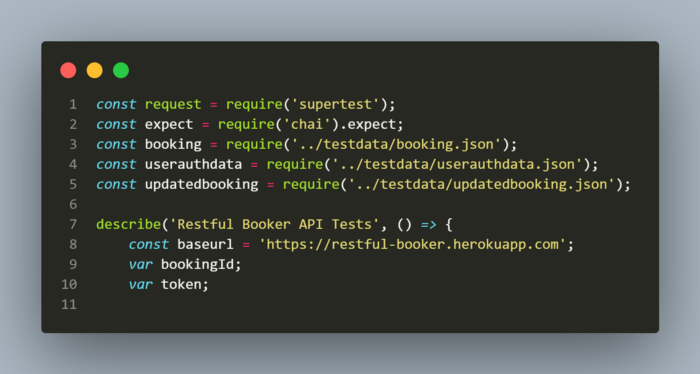
Import Statements and Global Variables used in the tests:
Create a Booking
Its very simple to send a Post request with the test data by using the request function and then calling the post function and after that send function to send the request body.
Lets start with request body first, here is how booking.json file looks:
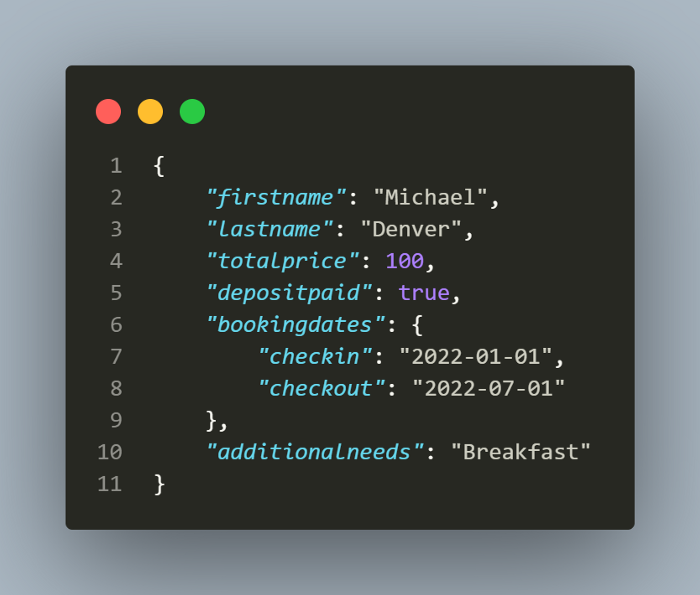
I have used the variable booking which actually imports the booking.json file and sends the data in the file as request body using send function.

Headers for the request are set by using set function and passing the required values in the header. Once the request, request body and headers are set we need to call the end function which performs the request and invokes fn(err, res) in which we can perform the assertions and in case if there is an error returned from the API request, it will throw an error. We need to call the done function once our test is complete. This is necessary as it informs the calling function(err,res) that the task is completed.
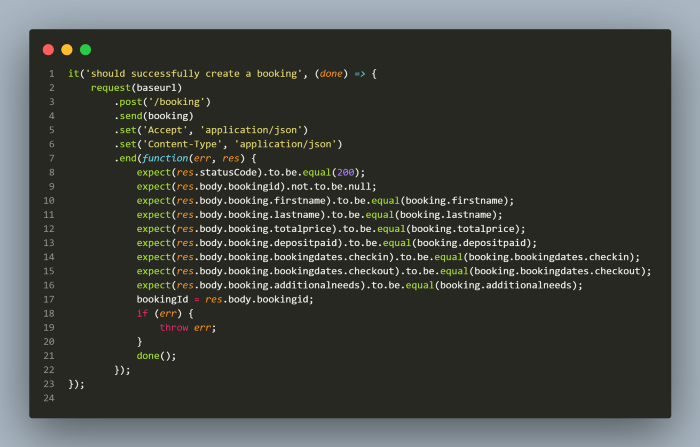
Booking id is saved in the bookingId variable which helps in the next Test of getting the booking id using Get Booking Id request.
Once the post request is sent successfully, all the data received in the response is validated using the expect function from chai library. The data from booking.json is asserted against the actual data coming in response which assures that what we sent in post request is actually what booking details are.
Get Booking
Similarly we can send a Get request by using the request function and then calling the get function.
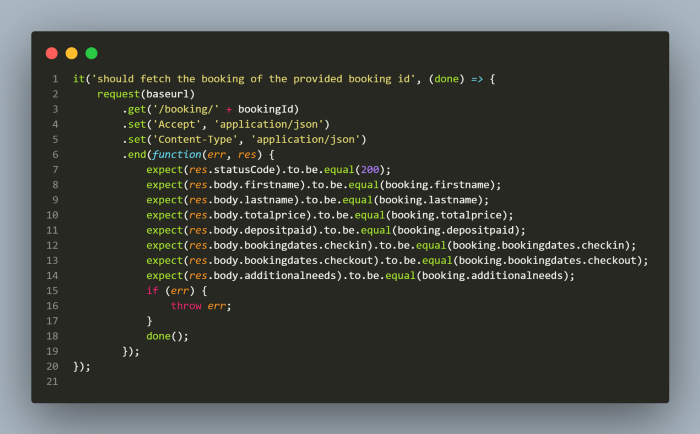
If you see closely, global variable bookingId is called as a parameter inside the get function which actually holds the value of booking id we saved using the post request as we discussed above.
Once the get request is sent successfully, all the data received in the response is validated using the expect function from chai library. All the data in the response is compared from the booking.json file.
Update Booking
For updating the booking, Put request needs to be sent and you might be knowing that for Put requests we need to send the full body in the request. We cannot just simply send the fields which we need to update. Hence, I created a new json file updatedbooking.json and have updated values for the booking dates and total price fields in it.
This is how updatedbooking.json looks:
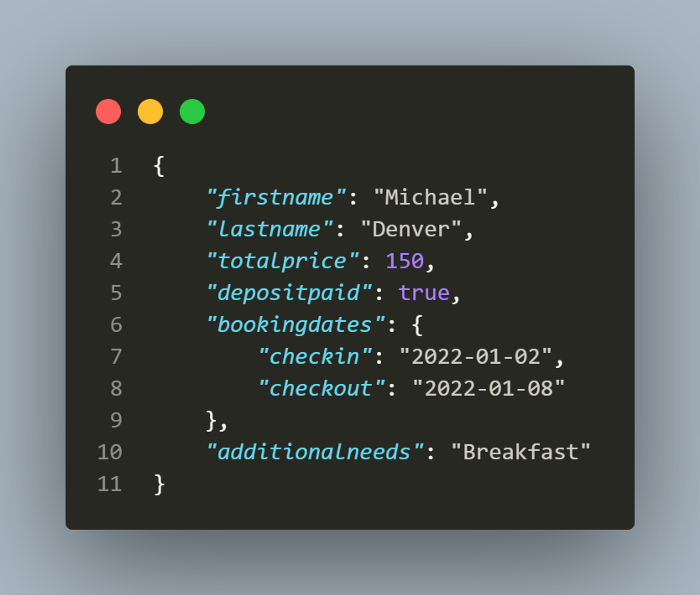
There is one more important point to take care of while sending the put request is, we would require an Auth Token without which we won’t be able to send the request successfully and in case if try to we send it, we will get 403:Forbidden error in response.
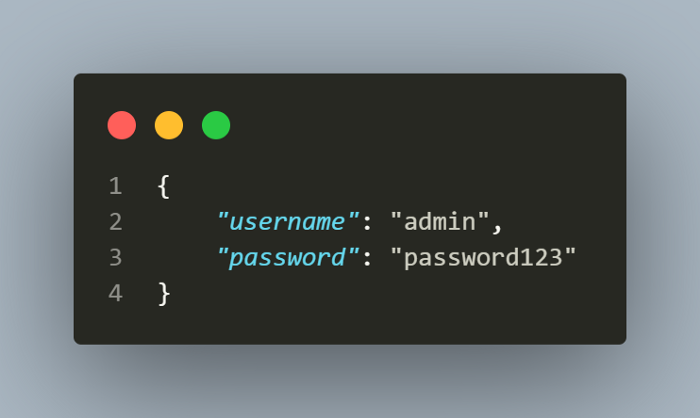
For getting the token successfully, we need to send login credentials which is consumed by the Post request and in the response delivers us the auth token. I have created another file for storing the credentials in a json file. Though, it is not a recommended way of storing the login credentials in a file, as a concern regarding security.
However, from the tutorial point of view, just to explain how we can get the token and pass it in tests, I have used it in this way.
For getting the token, I have added a function which runs before the tests and gets the token, stores it in the token variable and keeps it ready so we can use it in our tests. An assertion check has also been done here with respect to the status code and response body being not null after which value of token from response is stored in token variable.
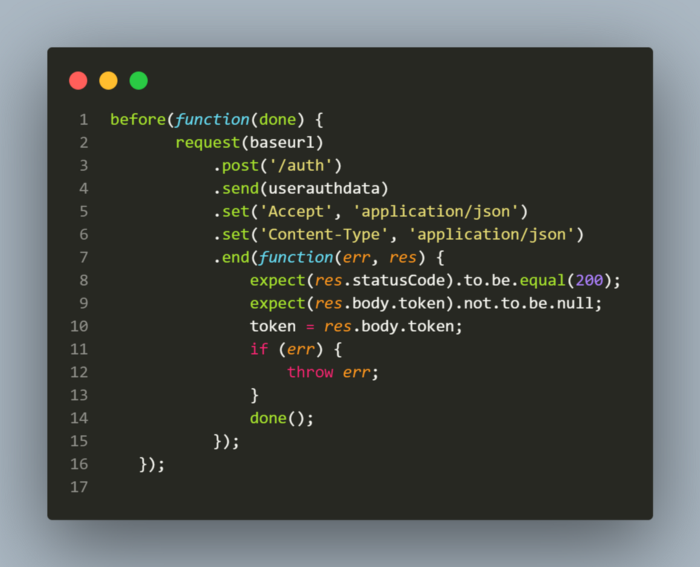
Once we have the token, we are ready to update the booking.
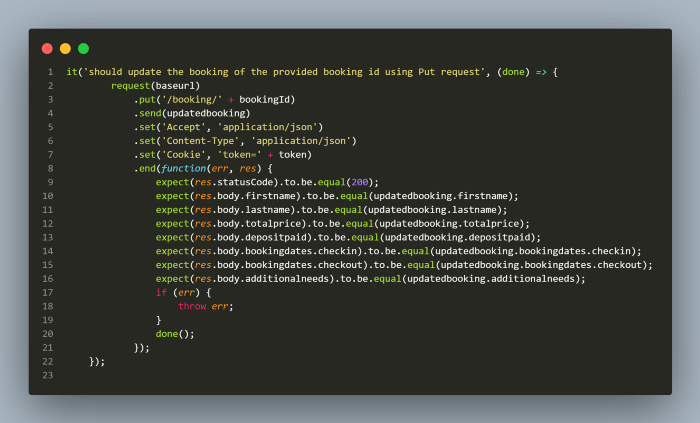
Important statement to note here is for setting the token value in the headerset('Cookie', 'token=' +token) is used. Since in the Header, key is Cookie and value is token=<token value>.
bookingId is supplied using the global variable which stored the booking id while creating the booking.
Once the Put request is sent successfully, assertions are done using the expect function from chai library and values are compared using the expected values from updatedbooking.json with actual values coming in response.
Partial Update Booking
The only difference between Partial update and Update is, Update Booking is done using PUT request whereas Partial Update is done using PATCH request.
Patch requests can be send in the similar way as we do for post and put. However, in case of patch requests you can send only the required fields which you need to update, hence sending whole request body with all the fields is not required like for PUT requests.
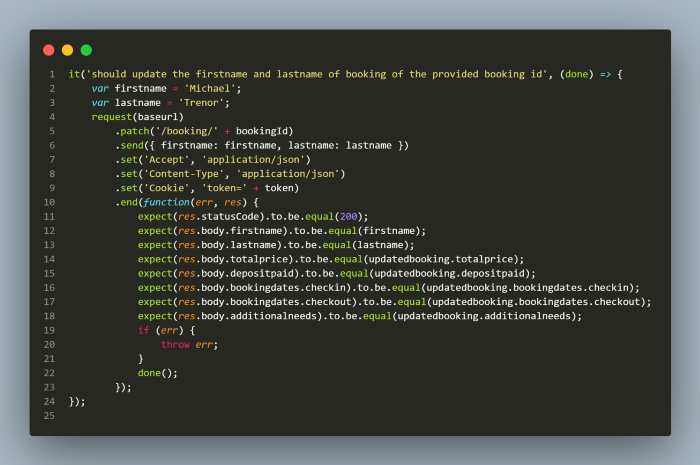
If you see in the screenshot attached above, I have sent only the firstname and lastname fields and its respective values using the send function. In addition, it also requires token to be set in header to send the requests successfully. bookingId is supplied using the global variable which stored the booking id while creating the booking.
Once Patch request is sent successfully, values for firstname and lastname fields are checked by comparing it with the actual values in the response with the value stored in the respective variables and rest of the response values are asserted with the updatedbooking.json since it has the latest updated values.
Delete Booking
Coming to the last step of our automation strategy where we check by deleting booking using Delete request. This is the easiest step to automate as minimal assertion is required, like, to check the status code as the data would be deleted once this request is sent.
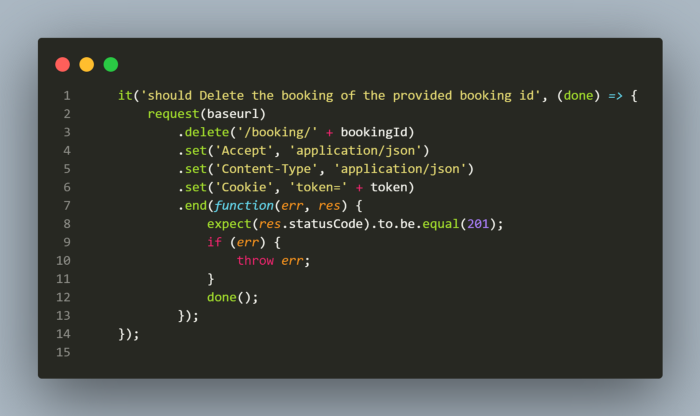
Here, token needs to be supplied in the header as well and booking id is supplied using the global variable. From the assertions, I am just checking the status code to be 201 once the delete request is successful. Ideally for Delete, we expect status code to be 204.
We can perform one more test after delete just to be sure that the delete actually deleted the booking which is by calling the Get request with the booking id which we just deleted and we can expect the request to return status code 404:Not Found.
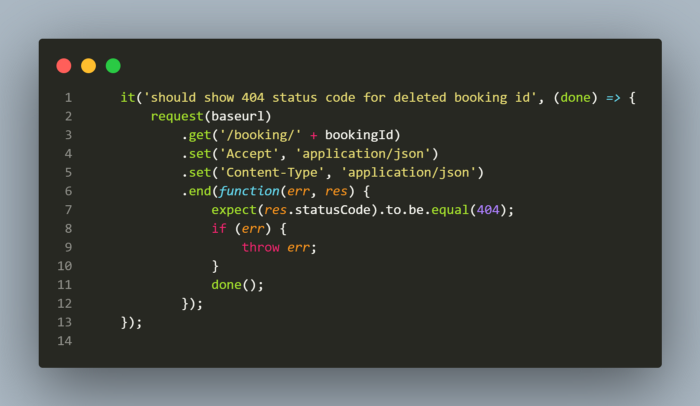
With this, all our end to end scenarios are complete. We tested by creating a booking, then updating it and then partially updating the name and finally delete the same booking id. We also tested by checking if the delete API actually deleted the booking by calling the Get request by entering the deleted bookings id.
Let me show you the script I have updated in the package.json file which will help in running the tests and generate a json file for test results which is used by github-actions to generate a report in the github actions workflow.
Checkout my blog, where I talk about creating a workflow using github actions for Node.js project

Lets run the test now! We just need to run the command npm test and that’s all.
Here is the sample mochawesome report showing test summary once all the tests are run successfully.
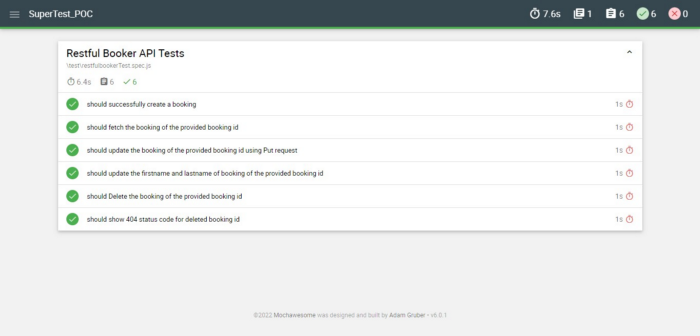
I hope you enjoyed reading the blog and most importantly understanding what API testing is all about, how to create a test automation strategy to test the APIs and actually test the APIs using supertest!
Github Repository
Checkout Github Repository here, it has all the code I have discussed above.
In case if you need any help, do reach out to me via chat on this site or Linkedin.
Happy Testing!!